Interface CAN
CAN is a communication interface for multiple devices on a common differential line. Expansion: Controller Area Network.
CAN came from automotive and industrial electronics, but in 3D printers it became popular for toolhead boards, remote MCUs, and modules where you need longer and more reliable communication than I2C/SPI.
Where CAN is useful
In printer and iDryer-like peripherals, CAN is used for:
- toolhead boards on the printer head;
- additional MCU in a remote block;
- reducing wire count in the cable bundle;
- communication with CAN filter, camera, or dryer boards;
- distributed system of multiple controllers;
- cases where USB or long I2C/SPI is inconvenient.
CAN is especially useful when a node is far from the host or main board, and there are motors, heaters, and other sources of noise nearby.
CANH, CANL, and GND
A physical CAN bus typically uses:
CANH;CANL;- sometimes
GNDor common reference wire; - module power separately, if needed.
Signal is transmitted as the difference between CANH and CANL. That's why CAN handles noise better than single signal lines.
Simplified diagram:
Source: Wikimedia Commons, EE JRW, CC BY-SA 4.0
For wiring, a twisted pair is often used for CANH/CANL. GND depends on the specific circuit, boards, and documentation, but in small DIY systems, a common reference is often needed for stable operation and interface safety.
CAN transceiver is required
Important: CAN support in the microcontroller and CAN presence on the board are not the same thing.
For CAN to work, you need:
- microcontroller with CAN controller or suitable firmware support;
- CAN transceiver on the board;
- correct
CANH/CANLconnectors; - transceiver power;
- terminators;
- firmware built for CAN.
If the microcontroller datasheet mentions CAN, but the board has no transceiver, you cannot connect directly to the CAN bus.
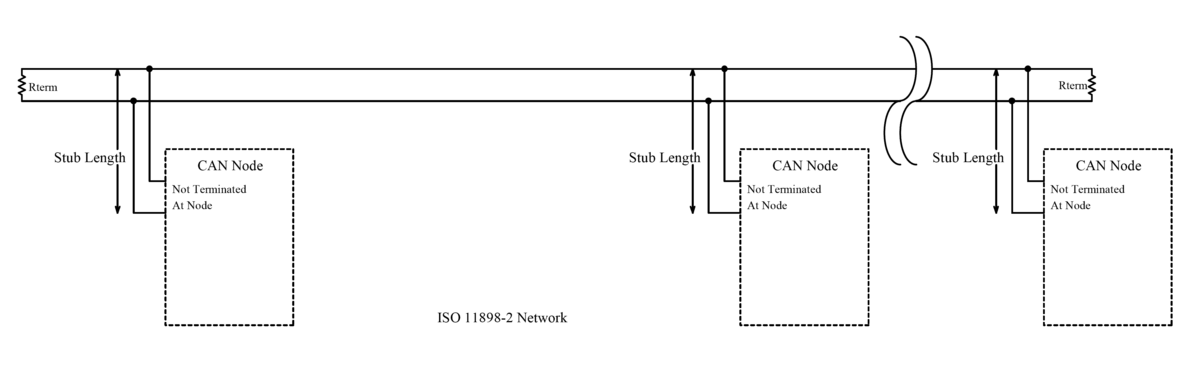
Topology and terminators
CAN is a bus. Good topology looks like a line with nodes attached via short branches.
Usually two 120 Ohm terminators are needed:
- one at one physical end of the bus;
- second at the other physical end.
Not one, not three, and not "on each board". Exactly two at the ends.
If power is off, on a properly terminated bus, a multimeter between CANH and CANL often shows around 60 Ohm, because two 120 Ohm resistors are in parallel.
Many boards have a terminator jumper. Some have a built-in terminator without convenient disable. So before assembly, check the schematics of all boards on the bus.
Bitrate
CAN speed must match on all nodes. In Klipper, CAN often uses 1000000, which is 1 Mbit/s, but the specific value depends on firmware, settings, and bus length.
If bitrate is different, nodes will not be able to communicate normally.
For long or problem wiring, speed may be critical. The higher the speed, the more demanding the bus is to topology, terminators, and wire quality.
CAN in Klipper
In Klipper, CAN is used as a way to communicate with MCU.
A device on CAN is usually not specified via serial:. Instead, the configuration uses canbus_uuid:
On the Linux side, you usually need a can0 interface. The host must have a CAN adapter:
- USB-CAN adapter;
- board in USB-to-CAN bridge mode;
- HAT/adapter for SBC;
- other supported circuit.
Klipper has a tool to find canbus_uuid of new uninitialized devices. Important to understand: if a device is already configured by Klipper, it may no longer appear in the list as "new".
USB-to-CAN bridge
Some boards can be flashed in USB-to-CAN bridge mode. Then the board connects to the host via USB, and appears to Linux as a CAN adapter.
This is convenient, but there is an important limitation: bridge mode is needed to communicate with a real CAN bus and other CAN nodes. If you only have one board near the host and no real CAN bus, it is usually simpler to use normal USB/serial mode.
Also, USB-to-CAN bridge will not be visible as /dev/serial/by-id/.... It is configured as a CAN interface and uses canbus_uuid, not serial:.
When CAN is justified
CAN is worth considering if:
- you need to connect a toolhead board;
- you need to run communication over a long cable bundle;
- you need multiple remote MCUs;
- you want to reduce wires between moving parts and enclosure;
- you already have CAN infrastructure;
- the chosen board is well documented for Klipper CAN.
CAN may be unnecessary if:
- the board sits near the host;
- you only need one additional MCU;
- USB works stably;
- you have no experience with flashing,
can0, terminators, and Linux networking; - the chosen board is poorly documented.
For the first simple additional controller, USB is often faster and clearer. CAN makes sense when it solves a real wiring or board distribution problem.
CAN does not power load
CAN is only communication.
If a CAN board controls a fan, heater, SSR, or servo, it still needs:
- board power;
- load power;
- MOSFET/driver/SSR;
- fuses;
- proper terminals;
- thermal protection for heaters;
- safe enclosure.
CAN does not replace power electronics and does not make a heater safe.
What to check before buying
Before buying a CAN board, verify:
- what microcontroller is used;
- if the board supports Klipper CAN;
- if there is a CAN transceiver;
- where are
CANHandCANL; - if there is a terminator and how to enable it;
- what connector is used;
- how the board is powered;
- how the board is flashed;
- if there is an instruction for
canbus_uuid; - if a separate USB-CAN adapter is needed;
- if there is a schematic and pinout;
- what pins and power outputs are available.
If the seller writes "CAN" only because the chip theoretically supports it, but the board has no transceiver and documentation, it's a poor choice.
Typical mistakes
- mixed up
CANHandCANL; - forgot that CAN transceiver is required;
- put one terminator instead of two;
- enabled terminators on every board;
- did not check resistance between
CANHandCANL; - chose different bitrate on nodes;
- expect
/dev/serial/by-idfrom USB-to-CAN bridge; - flashed board for USB, but connect as CAN;
- flashed for CAN, but did not configure
can0; - made a star from long branches instead of a bus;
- think CAN is a way to power load.
Key takeaway
CAN is a good interface for remote MCUs, toolhead boards, and distributed systems inside a printer. It uses a differential pair CANH/CANL, requires CAN transceivers, correct topology, and two terminators at bus ends.
For Klipper, CAN is useful but more complex than USB: you need to flash the board for CAN, configure the adapter/can0, find canbus_uuid, and verify the physical bus. Use CAN where it actually simplifies wiring or improves connection robustness.
Related materials
- Klipper: CANBUS - official Klipper CAN documentation: hardware, host adapter,
can0,canbus_uuid, terminators, and USB-to-CAN bridge. - Klipper: CANBUS protocol - how Klipper assigns CAN node id and uses
canbus_uuid. - CAN Bus Debugger: CAN Bus Termination Explained - practical explanation of two
120 Ohmterminators,60 Ohmmeasurement, and common mistakes. - DigiKey: CAN Bus explained - general overview of CAN bus, differential communication, and application in distributed systems.
- Texas Instruments: Introduction to CAN - basic description of CAN physical layer, transceivers, and typical network.